We’ve all been there. You excitedly cut into what you hope is a creamy, jammy egg, only to find a runny mess or, worse, a chalky yolk with that unappealing green ring. That disappointment ends today.
The secret to a perfectly boiled egg isn’t magic—it’s science. It’s about precisely controlling how the egg’s proteins (in both the white and yolk) coagulate, or set, with heat. A difference of just one minute can change the result entirely.
This definitive guide provides you with precise timing charts and a foolproof method to achieve any egg consistency you desire, from runny soft-boiled to classic hard-boiled. Let’s crack the code.
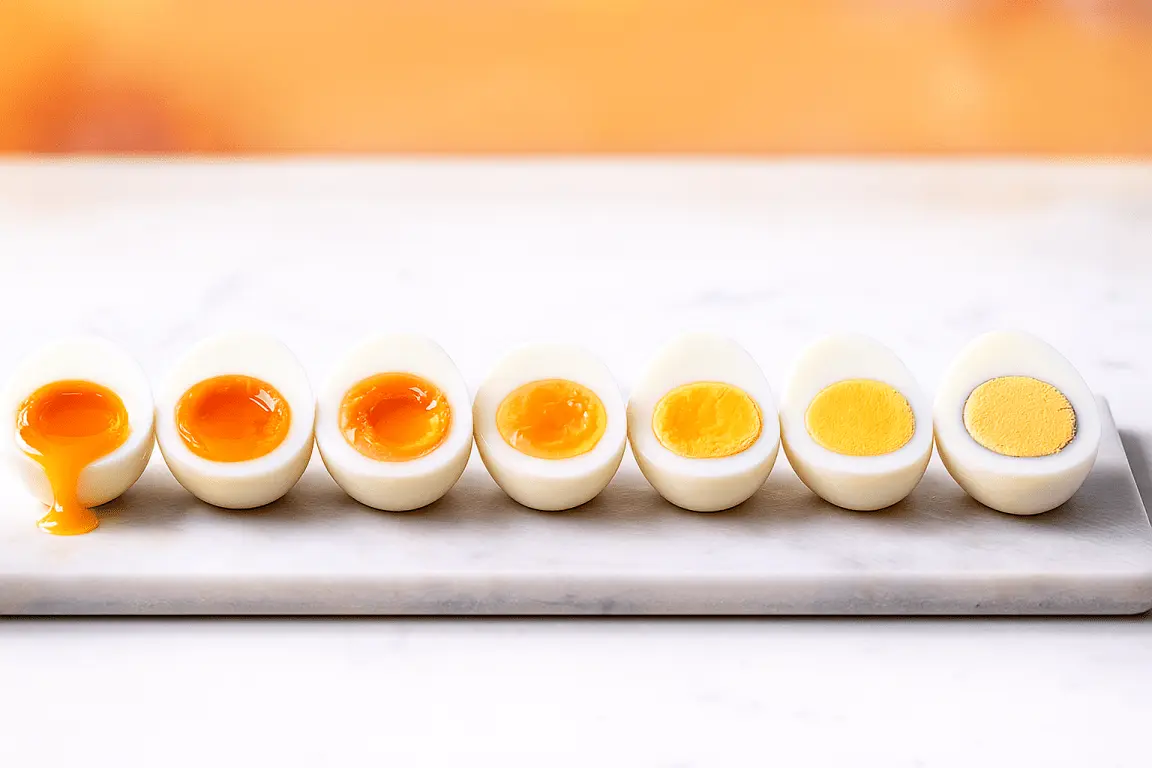
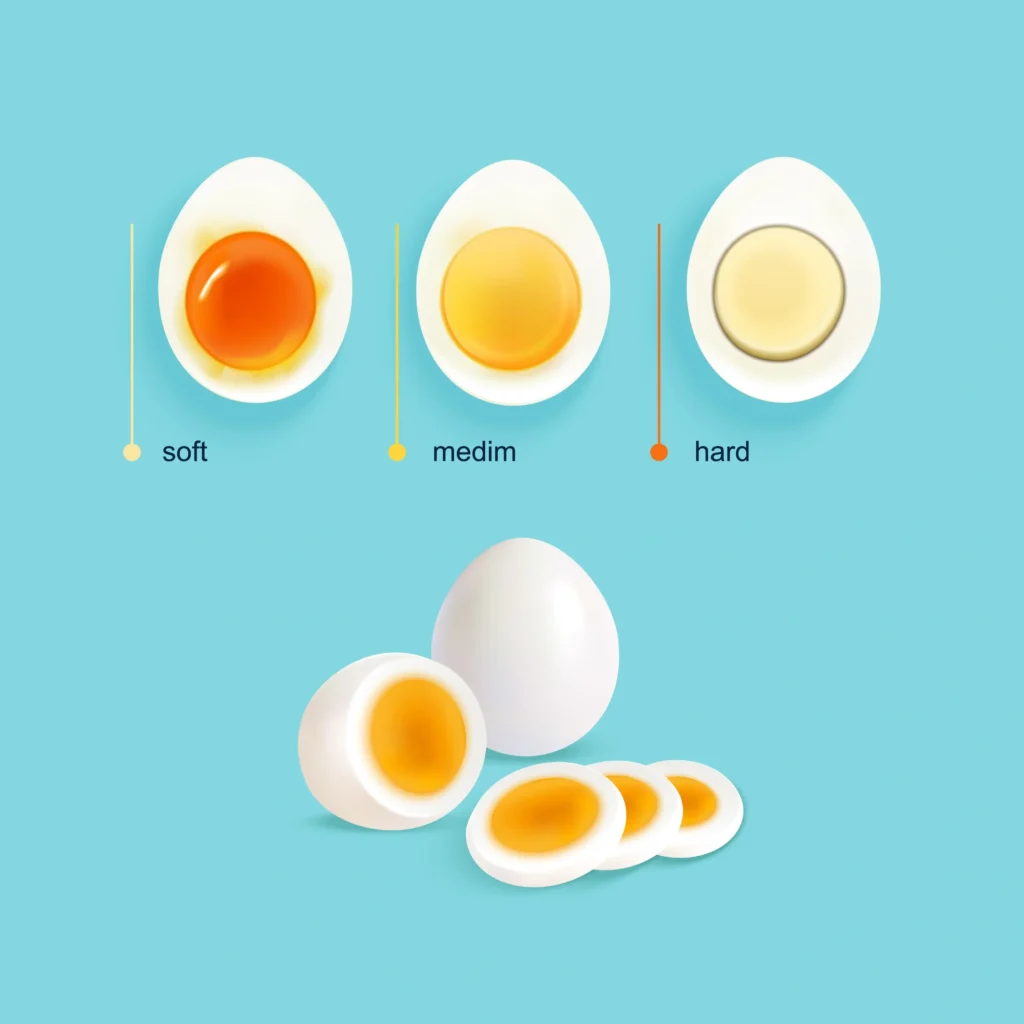
The Core Guide: Timing Chart for Perfect Consistency
Crucial Tip: For the most consistent results, we recommend the Cold Water Start Method (detailed steps below). The timings below begin once the water reaches a full boil.
Here is your go-to reference table. Bookmark this page or save the image below!
| Result | White (Albumen) | Yolk | Cooking Time (After Boil) | Best Use |
|---|---|---|---|---|
| Soft-Boiled (Runny Yolk) | Set but tender | Warm, runny, liquid | 4 to 5 minutes | Egg cups, toast dippers (“soldiers”), ramen topping |
| Medium-Soft (Creamy Yolk) | Fully set | Creamy, molten, slightly oozy | 6 to 7 minutes | Salads, avocado toast, rice bowls |
| Medium-Hard (Jammy Yolk) | Fully set | “Jammy” – custard-like, bright yellow center | 8 to 9 minutes | Sandwiches, snacks, perfect for most uses |
| Hard-Boiled (Classic) | Firm and solid | Fully cooked, fluffy, light yellow | 10 to 12 minutes | Deviled eggs, egg salad, sliced for garnishes |
Visual Aid: Immediately follow this section with a visual representation of the results.
Step-by-Step: The Foolproof Cold Water Method
Follow these simple steps for flawless eggs every single time.
- Place Eggs in Pot: Gently place your eggs in a single layer at the bottom of a saucepan.
- Add Cold Water: Cover the eggs with at least 1 inch (2.5 cm) of cold tap water. Starting cold prevents sudden temperature shock and reduces cracking.
- Bring to a Boil: Place the pot on high heat and bring the water to a full, rolling boil.
- Start the Timer: The moment the water reaches a full boil, start your timer for your desired consistency (see chart above). You can turn off the heat or reduce it to a low simmer.
- Prepare an Ice Bath: While the eggs cook, fill a large bowl with ice and cold water.
- Shock in Ice Bath: As soon as the timer goes off, use a slotted spoon to immediately transfer the eggs to the ice bath. Let them cool for at least 5 minutes. This stops the cooking process dead in its tracks.
Pro Tips & Troubleshooting: Solve Common Egg Problems
🧊 1. Never Skip the Ice Bath.
This is the most important step after boiling. It:
- Stops Overcooking: Prevents the residual heat from turning your perfect jammy yolk into a hard one.
- Prevents the Green Ring: Halts the chemical reaction that causes it.
- Makes Peeling Easier: The egg contracts inside the shell, creating a gap.
🟢 2. What is the Green Ring? How to Avoid It.
The harmless but unsightly grey-green ring around the yolk is ferrous sulfide. It forms when eggs are overcooked or cooled slowly.
Solution: Stick to max 12 minutes for hard-boiled and use the ice bath immediately. No more green rings!
🥚 3. The Secret to Easy Peeling? Use Slightly Older Eggs.
Very fresh eggs are harder to peel. Eggs that are 7-10 days old peel much more easily because the pH level changes, loosening the membrane between the shell and the white.
Peeling Tip: Gently tap the egg all over, roll it to crack the shell, then peel under cool running water. The water helps separate the shell.
💥 4. Preventing & Fixing Cracks.
- Prevention: Avoid a rapid boil; start with cold water and bring to a gentle boil.
- Fix: Add 1 teaspoon of salt or a splash of vinegar to the boiling water. This helps the egg white coagulate faster if a crack appears, sealing it shut.
⛰ 5. Boiling Eggs at High Altitude
At higher altitudes, water boils at a lower temperature, so cooking takes longer. As a general rule:
Add 30-60 seconds to your boiling time for every 1,000 feet (300 meters) above sea level. Adjust based on your preference.
Conclusion: Your Perfect Egg Awaits
The journey to the perfect boiled egg is simple: Precise Timing + Immediate Ice Bath = Consistent Success. We encourage you to experiment—find your sweet spot, whether it’s the 7-minute creamy yolk or the 9-minute jammy masterpiece.
Got your technique down? Now get the best ingredients at the best price. For the latest market rates and to make informed purchases, check the live, city-specific egg prices on TodayEggRate.com.
Happy cooking! Share this guide with a friend who deserves perfect eggs too. 🍳